How to use BlogGen
A visual guide for clients using BlogGen to request a content review, set up their account, approve blog content and keep their website active with useful articles.
What you need to do as a business owner
BlogGen handles the technical workflow. You only need to give us clear business information, review what matters, and approve content when it is ready.
Client steps at a glance
Use this guide to understand the main screens and actions.
Request a Free Content Review
Use the review form to tell BlogGen about your website, services, locations and content goals.
BlogGen stores the request, emails the site owner, prepares a content readiness report and sends the client a link to sign up.

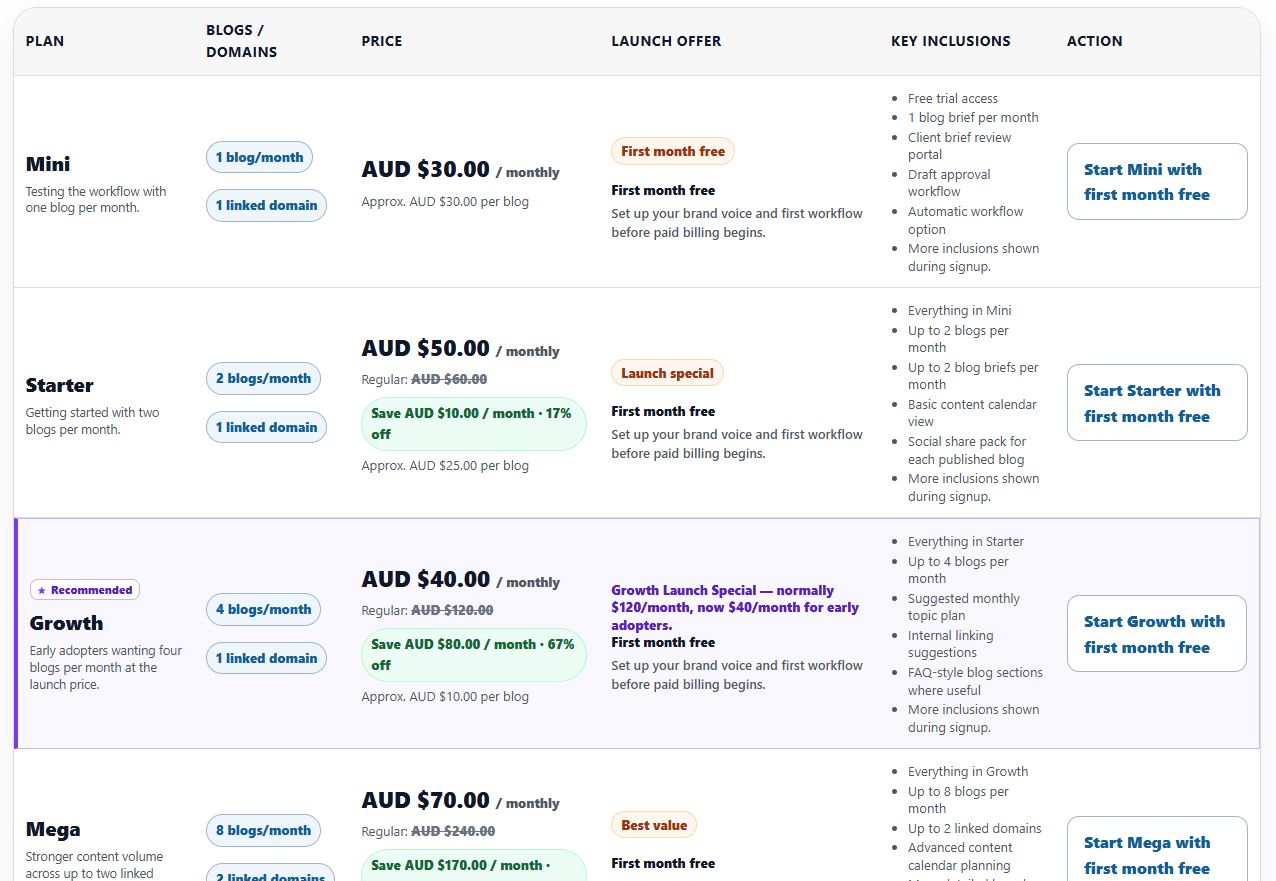
Choose a plan or Assisted Setup
Choose a monthly blog plan, then add Assisted Setup if the client wants help configuring the account.
The client chooses the monthly plan that suits them. Assisted Setup remains a separate one-off service.
Complete onboarding
Onboarding collects the client business details, target customers, services, locations and publishing preferences.
BlogGen creates or updates the client business profile and prepares the account for planning and drafting.
Complete onboarding
Set your writing guide
The writing guide page tells BlogGen how the business should sound, who it is writing for and what wording to avoid.
Future prompts, drafts, social posts and image prompts can use this client-specific writing guide.
Set your writing guide
Review Blog Ideas
Blog Ideas show the topic, angle and intended direction before a full draft is written.
Approved plans move into drafting. Change requests move back to the working stage.
Review Blog Ideas
Review drafts and approve publishing
When a draft is ready, check accuracy, tone, services, locations and industry-specific wording before approving.
Approved drafts can be published or scheduled. Change requests are sent back for revision.
Review drafts and approve publishing
Use Social Sharing
After publishing, BlogGen can prepare copy-ready social posts with a short synopsis and blog link.
The client can copy posts manually or use connected channels when Facebook/Instagram publishing is configured.
Use Social Sharing
Check invoices and reports
The client portal lets clients view payments, invoices, social packs and blog reporting in one place.
Invoices, payments and reports help the client understand what has been delivered and what is coming next.
Check invoices and reports
Connect your WordPress website with the BlogGen Connector
The connector is a small WordPress plugin installed on your own website. It lets BlogGen check the connection and publish approved content without asking for your normal WordPress password. It can also store Facebook and Instagram publishing credentials on your own website, so Meta tokens do not need to be stored in the Hub.
Download and install BlogGen Connector v1.1.23
Follow these steps on the website where your blogs will be published.
- Download the BlogGen Connector ZIP using the button below.
- Log in to your own WordPress website as an administrator.
- Go to Plugins → Add New Plugin → Upload Plugin, upload the ZIP, click Install Now, then Activate.
- Open Tools → BlogGen Connector on your WordPress website.
- Copy the connection code shown on that screen. Keep it private. If you want social publishing, also complete the Facebook Page and/or Instagram Business settings on this Connector screen.
- Return to BlogGen and paste the website URL and connection code into the website connection screen, then run the connection test.
Do not send your normal WordPress password. The connection code is used only for the BlogGen connection workflow and can be regenerated from the connector screen if needed. Meta access tokens for Facebook and Instagram stay inside the Connector on your own website.
After activating the connector on your website, open Tools → BlogGen Connector. The token and connection check information are shown there.
Connection checklist
Before approving a blog, check these items
Before content goes live, the business should check the details that only they can confirm.
Want setup help?
Assisted Setup can help configure the practical pieces before the first monthly cycle begins.